How to Install an Undermount Kitchen Sink in 2026?
FLUID HANDLING EXPERTS

Blog, all our news

How to Install an Undermount Kitchen Sink in 2026?

Installing an Under Mount Kitchen Sink in 2026 requires more than cutting a countertop opening. It demands accurate measurement, stable support, and careful sealing. A beautiful sink can still fail if the stone edge is weak. Water damage is expensive.

Houzz’s 2024 U.S. Kitchen Trends Study reported a median major kitchen remodeling spend of $75,000. That figure explains why small installation mistakes deserve serious attention. The National Kitchen & Bath Association’s 2024 Design Trends Report also highlights durable, practical kitchen materials. An undermount sink supports that direction, but only when installed correctly.

This guide explains how to install an Under Mount Kitchen Sink with professional methods and realistic precautions. You will learn how to confirm cabinet clearance, mark the cutout, position support rails, and apply compatible silicone. The countertop must remain clean and dry. The adhesive needs time to cure.

Measure twice.

Experienced installers still encounter uneven cabinets, warped sink rims, and confusing manufacturer templates. I have found that the template is helpful, but it is not always perfect. Check the actual basin before cutting. That extra step may prevent an expensive replacement.

The instructions also address plumbing alignment, faucet clearance, leak testing, and safe lifting. Always follow the sink manufacturer’s instructions and current local plumbing requirements. Product specifications can change by 2026. This guide is practical, but it cannot replace an inspection by a qualified professional when the countertop, cabinetry, or plumbing system is complex.
How to Install an Undermount Kitchen Sink in 2026?

Assess the Countertop, Sink, and Cabinet for Undermount Installation

Before choosing an undermount sink, inspect the countertop’s material, thickness, and condition. The 2024 Houzz U.S. Kitchen Trends Study reports that 76% of renovating homeowners replace their countertops. That makes countertop planning especially relevant, but replacement is not always necessary. A stone or solid-surface top can often support an undermount installation when its cutout edges are sound and properly finished. Laminate and some other materials may need specialized edge treatment or may not be suitable. Check the countertop maker’s installation guidance, too.

Look closely at the proposed cutout. Hairline cracks, chipped edges, or a narrow strip of material behind the sink can weaken the support. Measure the sink bowl and cabinet opening, then confirm there is room for clips, plumbing, and a disposal if planned. Tight fit. Check the cabinet’s top rails and side panels for water damage, loose joints, or sagging; a heavy, water-filled sink needs reliable support. Sink weight varies, so follow its installation instructions rather than guessing. I’ve seen small alignment errors become frustrating leaks, and measurements can be imperfect. Recheck them before cutting, and ask a qualified countertop installer to assess uncertain materials or structural damage.

Gather Tools, Materials, and Safety Equipment

Before lifting the countertop or sink, prepare every tool and material on a dry, clear work surface. You’ll typically need a tape measure, pencil, drill, suitable hole saw, clamps, and a compatible sink-mounting kit. Keep the sink manufacturer’s installation instructions nearby; countertop materials and mounting systems differ. Have plumber’s putty or approved sealant, silicone, a wrench, and a bucket ready for plumbing connections. Check that the faucet, drain, and supply lines fit before sealing anything. Measure twice. A small mismatch can mean a second trip to the hardware store.

Protective equipment matters, even during a short job. Wear safety glasses when drilling, cut-resistant gloves while handling sharp sink edges, and hearing protection when using loud power tools. OSHA’s 2023 workplace injury data, reported by the U.S. Bureau of Labor Statistics, recorded 2.6 million nonfatal cases in private industry. Those figures are not specific to home renovations, but they reinforce a practical point: routine tasks still carry risks. If the countertop is stone or another heavy material, arrange help with lifting and confirm the surface can safely support the sink and mounting hardware.

Tips: Lay out parts in installation order, and keep a flashlight, clean rags, and a stable work light within reach. Unplug tools before changing bits. I sometimes overprepare, but missing one clamp can turn a neat installation into a frustrating one. If drilling or supporting the countertop feels uncertain, pause and consult a qualified installer.

Create the Sink Cutout and Prepare the Countertop Edges

How to Install an Undermount Kitchen Sink in 2026?
Create the Sink Cutout and Prepare the Countertop Edges

Measure the sink several times before marking the countertop. Use the sink manufacturer’s template, but check it against the actual basin; templates can shift or vary. Center the cutout on the cabinet and confirm that clips, faucet holes, and plumbing will have room. A small mismatch can leave a visible gap or weaken the edge. Dry-fit the sink when possible.

Cut the opening with a tool suited to the countertop material, supporting the waste piece so it cannot drop and chip the edge. Stone and engineered surfaces require specialized equipment and careful dust control. OSHA’s respirable crystalline silica standard sets an eight-hour permissible exposure limit of 50 micrograms per cubic meter (29 CFR 1910.1053). Use wet methods or effective dust extraction, and follow the fabricator’s safety guidance. Not glamorous, but important.

Smooth and seal the cut edge as the material requires. For stone, a fabricator can hone or polish the exposed profile; laminate edges need protection against moisture. Remove dust, then inspect the rim under bright side lighting. Feel for sharp spots with a gloved hand. Don’t rush this check. A rough or uneven edge can interfere with a tight sink seal, and sealant cannot correct a badly shaped cutout.

Secure the Sink Beneath the Countertop

How to Install an Undermount Kitchen Sink in 2026?
Secure the Sink Beneath the Countertop

An undermount sink hangs below the countertop, so its support must be solid before you apply sealant. Check that the cabinet can carry the sink’s weight when full of water. Confirm the countertop material is suitable for an undermount installation, and follow its fabricator’s guidance. Stone and other heavy materials may need specific support hardware. A dry fit helps reveal trouble early. The sink should sit level, with an even gap around the opening.

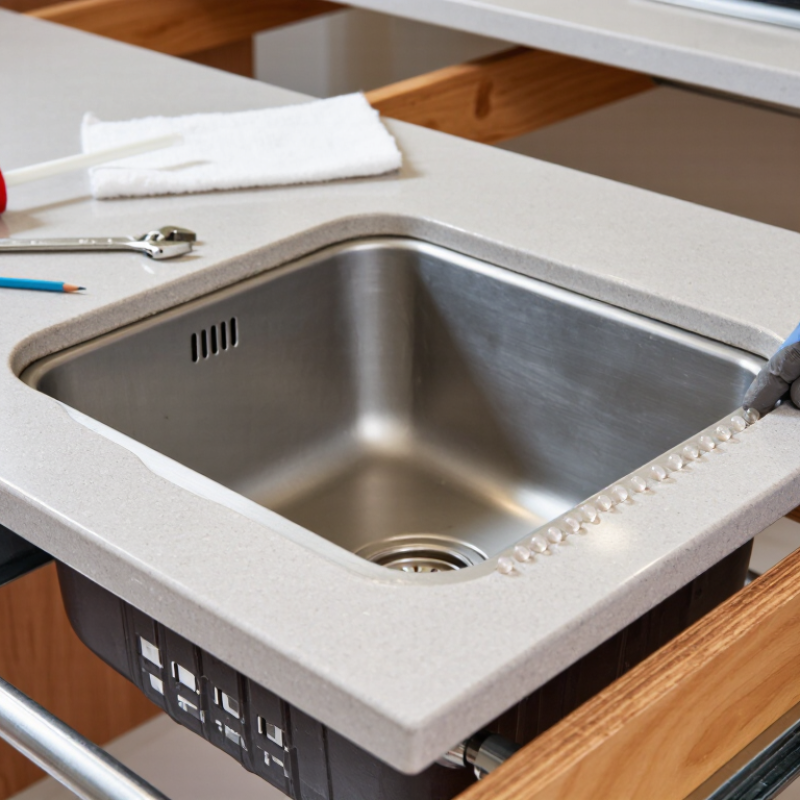
Clean the countertop underside and sink rim, then let both surfaces dry completely. Apply a continuous bead of kitchen-safe silicone along the rim, keeping it close to the edge without blocking the basin. Lift the sink into position using a proper sink support or adjustable braces. Don’t rely on sealant alone. Install the specified clips or brackets and tighten them gradually, alternating sides to keep the rim evenly seated. Wipe away squeezed-out silicone before it cures.

Leave the support in place for the sealant’s stated curing time; the surface may feel dry before the bond is ready. Check the joint with a bright light. Small gaps are easy to miss. If the sink shifts, the countertop edge chips, or the mounting hardware doesn’t sit flush, stop and reassess rather than forcing it. Installation details vary by sink and countertop, and a professional installer can help when the surface or support system is uncertain.

Seal the Joint, Connect the Plumbing, and Test for Leaks

A clean seal is only part of an undermount sink installation. After the sink is firmly supported, apply a continuous bead of kitchen-and-bath silicone around the rim, without leaving gaps at the corners. Press the countertop down evenly, then wipe away squeeze-out with a damp cloth. Follow the sealant’s stated curing time before running water; rushing this step can weaken the joint. It is easy to miss a thin spot near the faucet side. Check it closely under bright light.

Once the seal has cured, reconnect the drain, trap, and supply lines. Tighten fittings securely, but avoid forcing them; overtightening can damage threads or washers. Place a dry paper towel beneath each connection. Run cold water, then hot water, and fill the basin briefly before releasing it to test the drain under flow. Look for fresh dampness around the rim and plumbing. The U.S. Environmental Protection Agency reports that household leaks can waste nearly 10,000 gallons of water annually, while 10% of homes have leaks wasting 90 gallons or more per day (EPA, “Fix a Leak Week”). A small drip deserves attention. Recheck the towel after several minutes, and inspect again the next day; one quick test can miss a slow leak.

Copyright 2025 Fluidra S.A. | Created by BCM Marketing Agencia Privacy Policy Legal note | Cookie policy |

Technical cookies are strictly necessary for our website to work and you can navigate through it. These types of cookies are those that, for example, allow us to identify you, give you access to certain restricted parts of the page if necessary, or remember different options or services already selected by you, such as your privacy preferences. Therefore, they are activated by default, your authorization not being necessary in this regard. Through the configuration of your browser, you can block or alert the presence of this type of cookies, although such blocking will affect the proper functioning of the different functionalities of our website.


The analysis cookies allow us to study the navigation of the users of our website in general (for example, which sections of the page are the most visited, which services are used most and if they work correctly, etc.). From the statistical information on navigation on our website, we can improve both the operation of the page itself and the different services it offers. Therefore, these cookies do not have an advertising purpose, but only serve to make our website work better, adapting to our users in general. By activating them you will contribute to this continuous improvement. You can enable or disable these cookies by checking the corresponding box, being disabled by default.


Functionality cookies allow us to remember your preferences, to personalize certain characteristics and general options of our website, every time you access it (for example, the language in which the information is presented to you, the sections marked as favorites, your browser type, etc.) Therefore, this type of cookies does not have an advertising purpose, but by activating them you will improve the functionality of the website (for example, adapting to your type of browser) and the customization of it based on your preferences (for example, by presenting the information in the language that you have chosen in previous occasions), which will contribute to the ease, usability and comfort of our page during your navigation. You can enable or disable these cookies by checking the corresponding box, being disabled by default.


Advertising cookies allow us to manage the advertising spaces included in our website based on criteria such as the content shown or the frequency in which the ads are displayed. For example, if you have been shown the same ad several times on our website, and you have not shown a personal interest by clicking on it, it will not appear again. In summary, by activating this type of cookies, the advertising shown on our website will be more useful and diverse, and less repetitive. You can enable or disable these cookies by checking the corresponding box, being disabled by default.


Behavioral advertising cookies allow us to obtain information based on the observation of your browsing habits and behaviors on the web, in order to show you advertising content that best suits your personal tastes and interests. To understand it in a very simple way, we will give you a fictitious example: if your last searches on the web were related to suspense literature, we would show you advertising about suspense books. Therefore, activating this type of cookies, the advertising that we show you on our website will not be generic, but will be oriented to your searches, tastes and interests, therefore adjusting exclusively to you. You can enable or disable these cookies by checking the corresponding box, being disabled by default.
To understand it in a very simple way, we will give you a fictitious example: if your last searches on the web were related to suspense literature, we would show you advertising about suspense books. Therefore, activating this type of cookies, the advertising that we show you on our website will not be generic, but will be oriented to your searches, tastes and interests, therefore adjusting exclusively to you. You can enable or disable these cookies by checking the corresponding box, being disabled by default.

SAVE

We use our own and third-party cookies to ensure the proper functioning of the website and to analyse our services, improve your experience on our website and show you advertisements related to your interests according to profiling based on your browsing habits (e.g. websites visited). You can accept all cookies by clicking "ACCEPT" or set or reject them by clicking here. If you would like to know more about the use of cookies, please see our COOKIE POLICY.


ACCEPT ALL
Reject no essentials